Thanks for choosing Poptics—your go-to solution for lead generation and boosting sales through engaging popups! Let’s get started with installing it on your WordPress site.
System Requirements
Before you begin, make sure your WordPress setup meets the latest system requirements to run Poptics smoothly. This ensures you get the best experience with the plugin.
Requirements
WordPress Version: 5.2 or, higher
Poptics Plugin
PHP Version: 5.6 or higher
PHP memory_limit = 512M
max_execution_time = 600
Installing via the WordPress Dashboard
Installing Poptics directly from your WordPress dashboard is super easy! Just follow these steps:
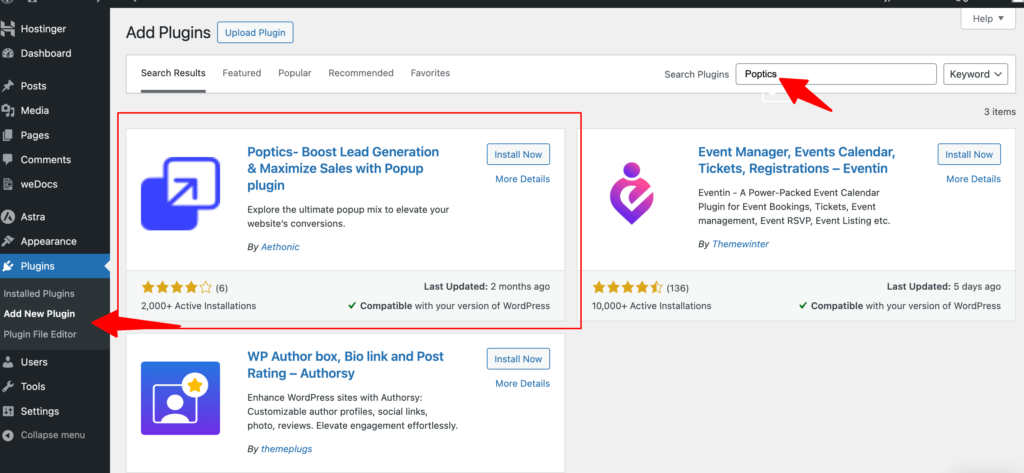
- In your WordPress admin area, go to Plugins > Add New.
- In the search bar at the top right, type “Poptics” and hit Enter.
- When Poptics appears in the results, click Install Now.
- After a few seconds, the Install Now button will change to Activate. Just click Activate, and you’re all set!
That’s it—Poptics is now ready to help you grow your leads and sales!
Installing or Updating via FTP/SFTP
If you prefer installing Poptics manually or need to update it, you can use FTP or SFTP. If you’re not sure how to do this, your hosting provider can assist.
Here’s what you’ll need:
- Your FTP or SFTP login details (host, username, password, and port number)
- An FTP client like FileZilla (or one recommended by your hosting provider)
Once you have these, here’s how to proceed:
- Download the plugin: Grab the Poptics zip file and save it to your computer.
- Unzip the file: Extract the zip file to access the plugin folder.
- Upload the files: Open your FTP/SFTP client and navigate to your site’s wp-content/plugins folder. Upload the extracted Poptics folder here.
- Overwrite if updating: If you’re updating the plugin, overwrite the existing Poptics files. Don’t worry—your settings will stay safe.
Once the upload is done, head back to your WordPress dashboard to activate or update Poptics!
Keeping Your Plugin Updated
Regular updates keep your plugin working perfectly and unlock new features, improvements, and bug fixes. You can update Poptics using the same steps outlined above via FTP/SFTP or directly from your WordPress dashboard.
Upgrading to Poptics Pro
Looking to upgrade to Poptics Pro for even more powerful features? Check out our detailed guide on How to Upgrade from poptics free to Pro.
Activating Your License
Once you’ve upgraded, you can activate your Poptics Pro license by following our easy guide here.
That’s it! You’re all set to make the most of Poptics. Need any help? Feel free to reach out to us anytime—we’re here to assist!